🌦️ Own the Weather, Own the Moment
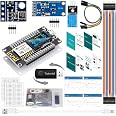
The ESP8266 Weather Station Kit by ideaspark is a compact, battery-powered IoT starter kit featuring a NodeMCU ESP8266 board integrated with a 0.96-inch OLED display. It combines DHT-11, BMP-180, and BH1750 sensors to measure temperature, humidity, atmospheric pressure, and light intensity with ±1°C accuracy. The device pulls live weather data from openweathermap.org and uploads local sensor data to ThingSpeak for real-time monitoring, making it ideal for home automation and energy-efficient control systems. Its plug-and-play design with USB and I2C connectivity, plus beginner-friendly tutorials, make it a must-have for professionals eager to join the IoT wave.


| Brand | ideaspark |
| Specific Uses For Product | IoT starter kits |
| Power Source | Battery Powered |
| Special Feature | IoT Capabilities, Real-time Monitoring, Energy-efficient Control System |
| Connectivity Technology | USB, I2C |
| Style | Modern |
| Color | Weather Station Kits |
| Included Components | Cable, Instruction Manual |
| Temperature Accuracy | +- 1 degree Celsius |
| Are Batteries Included | No |
| Sensor Technology | DHT-11: Capacitive humidity sensor and thermistor; BMP-180: Piezoresistive pressure sensor; BH1750: Photodiode with integrated signal processing circuit |
| Manufacturer | Generic |
| Shape | Rectangular |
| Display Type | LCD |
| UPC | 714453670504 781520959756 |
| Standing screen display size | 0.96 Inches |
| Item model number | 8541612567 |
| Operating System | Windows |
| Item Weight | 3.52 ounces |
| Product Dimensions | 5.7 x 3.34 x 1.37 inches |
| Item Dimensions LxWxH | 5.7 x 3.34 x 1.37 inches |
| Processor Brand | VIA |
| ASIN | B07GPBBY7F |
| Is Discontinued By Manufacturer | No |
| Date First Available | August 21, 2018 |
S**N
Read other reviews - varying models received
Read the other reviews as there seem to be varying models from this page as the product goes in and out of stock. My model matched the documentation for all of the proper pin outs and setting up the code with the chipsets.Needs on your end to get this working properly:You do need to solder. For my kit this was two sensors.You do need to set up an account (free) on ThingSpeak to have the data logging of all the sensors (the "Weather Instrument").You do need to set up an account (free) on OpenWeatherMap to display local (or wherever you set the area) weather (the "Weather Station").You will need WiFi to connect the device to the internet, if you want to log directly to a service or pull weather information for whatever area you want to display.All in all, I got the kit up and running properly in less than 3 hours, so not bad! A note for ThingSpeak is that the free accounts can log every 15 seconds, where the source provided is set for every 120 seconds. You can change the given to the below:uploadTime > 15000Also, the weather station needs to have location and time, so you'll need to look up on OpenWeatherMap the area and pull the number of what that is, and set your time zone properly.TZ for UTC (negatives should work)OPEN_WEATHER_MAP_LOCATION_ID for the place you are and can be found on the web page when you look it up on that website.
Q**N
Software installed, now what?
The product comes with a USB thumb drive that has clearish instructions on installing the software, however you won't be so lucky with the hardware instructions. After pouring over the included instructional materials I was unable to make heads or tails out of the clear as mud hardware information...because that all it really is, clear as mud hardware information.The quality of the product is well built and the appearance is good. However when you unable to figure out what to do with hardware like a temperature sensor it does not feel like a good value for the money.
C**Y
Absolutely awesome project
I bought this for my kids with the intention of just giving it to them and letting them play around but I actually took it for myself and I had a lot more fun messing around with it putting it together and getting everything to work the way that I wanted to so that way I could use it as another payload system for my rocket That I would send up into the atmosphere and let it collect atmospheric data for me
J**R
not bad little kit...
All in all, not bad. ESP8266 boards can sometimes be a pain to flash..but after several goes.. all the code landed there. I had to update a library after compile failed, but this was noted in the manual. I followed insttructions and fixedOne thing that needs to be changed. No more forecasting is available without paid API key from OpenWeather. The current conditions are available for free and are read into the canned program, but ideally the script needs to be updated to remove that completely and better leverage the current daily conditions. I see in the github log, WU API was deprecated a while back in favor of OpenWeather. WU dropped this not the vendor. I am guessing that when this code was updated OW had more capabilities. Now it does not. Took a bit of reading to find why the forecast on the unit's screen was completely wrong.I would have thought the sensor data would show up on the OLED out of the box, but it appears to not be the case.You will need a little soldering to put the header pins on the boards, but easy enough.If you do not have everything properly attached the program will continuously reconnect to WiFi. Make sure the OLED board is setup first so you can see what is going on. I had a bad connection on the pressure sensor which caused it 'reboot' looking for it. Once found, it completes startup and runs fine, even if you lose a connection after the fact. So if you see Connecting...and it start to show data on OLED.. and the connects again.. there is a sensor that is not found. You can use Serial Log in Arduino IDE to monitor live and it will tell you what is not quite right. Kudos to team for putting text out on issues..Now to alter the OLED bits to get data to it since forecast is not available.
V**O
Weather Station Challenge of the Century!
Getting an account for the keys is a PITA. Once i got the keys, I built the circuit only to find out there was no cable in the kit, I rummaged through all my cables and found one. Due to the lack of reasonable documentation, configuration of the program was a PITA as well. There are lots of settings that you must carefully go through the program to find and set for your specific configuration. Started up the Weather Station only to see that it was not functional. Did a multi rinse and repeat on wiring up the circuit, finally convinced myself one of the parts was bad. So I grabbed my trusty Arduino Uno and wrote code to test each part, found that the DHT11 was DOA. So I got new parts and tested them and they checked out, plugged it in and configured the software and loaded it onto the ESP. Program woke up and showed the time, it was wrong, missed a config. fixed the time offset and re-programmed. Time came up correct, display switched to temp and no matter if it was F or C it displayed 0.0 when display switched to the 3 day forecast, it shown "Wed, Wed, Wed" never mind that its Saturday. The Weather Station never displayed pressure form BMP180, or GY-30 light intensity display or DHT11 Temperature or Humidity locally so why are these there? Anyway, the only thing that went well is the ESP8266 uploaded and downloaded to the web sites smoothly. It was easy to connect to the network. In a nut shell what was advertised is not what you get, what you get are a bunch of low cost knockoffs for components and someone elses fragmented code. IF you want to learn a lot this is the kit for you, me I just wanted to assemble it and turn it on. Not going to do this again. In hind site I should of created the code myself and purchased higher quality parts, I would have been much happier! My experience level is fairly good since I built my own Programmable PID controller, including making my own PCB for it.
Trustpilot
1 month ago
4 days ago