🚽 Elevate Your Clean Game with LUXE!
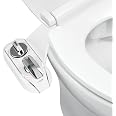
The LUXE BidetNEO 320 Plus is a state-of-the-art bidet attachment designed for easy installation and superior cleaning. With its innovative flip-up design, 360° self-cleaning feature, and dual nozzles for both feminine and rear wash, it offers a luxurious experience. Available in multiple stylish finishes, this bidet combines functionality with modern aesthetics, backed by an 18-month warranty.


| Manufacturer | LUXE Bidet |
| Part Number | NeoPlus320ch |
| Item Weight | 2.14 pounds |
| Product Dimensions | 17.7 x 7 x 0.99 inches |
| Item model number | NeoPlus320ch |
| Color | Chrome |
| Style | Modern |
| Material | Stainless Steel |
| Pattern | Toilet Seat |
| Shape | U-Shape |
| Item Package Quantity | 1 |
| Included Components | NEO 320 Plus Bidet Attachment |
| Batteries Included? | No |
| Batteries Required? | No |
K**R
Excellent Adjustable Bidet Add-on For Existing Seats! Easily/Quickly Installed (with a Few Caveats)
This Luxe Bidet NEO 320 Plus is an excellent choice for those seeking to add a Bidet without changing their existing toilet seat, which in my situation, was exactly the case, since I have a preferred seat color that is not easy to find (without mixing some paint). As you can see in the pics I've provided, the typical white seat just wouldn't cut it with my vintage 50's green fixtures and wheat/yellow tile. In fact, I was even concerned that this Bidet being mostly white was going to be a real eye-sore, but fortunately, that didn't turnout to be the case. Frankly, the highlights of white and chrome actually even add a bit of additional bling to the décor!So now, first off, I've provided a couple pics to show you all that comes in the very professionally designed and packaged box, including everything most folks will ever need to do the install, even with a couple extra spacer options for those needing to elevate their seat another 1/8" or so, or that are installing with a Luxe Toilet Seat. Of noteworthy significance is the size and professional quality of the printed material included in the package. This is clearly a top-notch company, not trying to squeak by saving a few bucks at the expense of the customer. They really do step-up to give you the maximum in customer service, not only in the package, but also if you find yourself needing to communicate with them, and yes, they even provide a phone number so you can talk to a real person, if you like. They strike me as a company that listens to customer feedback and actually makes improvements to their product and kit contents as a result. They even provide accessories on their website (luxebidet.com) such as alternate colored face-plate stickers that a person might find desirable to better compliment their bathroom color-scheme.The next couple pics I've provided will show you the location of the LUXE ID, which when you read the manual, it will tell you to be sure and record it. I actually peeled the sticker and stuck it right on that page in the manual, along with taking the pics for a digital record. (BTW, when it comes to removing the sticker(s) you may find a thin layer of glue residue that is pretty stubborn and it is not water-based, so soap or alcohol won't do the trick, but a shot or dab of a light oil/solvent like WD-40 will take it right off.)I opted to give you quite a few pics of my particular bathroom, so you could see not only the cosmetic issues, but also what you might run into if you have an older home and original fixtures, like I do. When you read in the reviews about folks installing the Bidet in 10 minutes, firstly, they are estimating, and secondly, they probably installed a cold-water only model, and thirdly, they probably only counted the time from when they had everything, including tools, in the bathroom sans prep-time and cleanup time, and fourthly, they probably really spent about 20 minutes on the project, overall. Oh, and even prior to firstly, their bathroom fixtures were likely relatively new. If you have newer fixtures, the process will likely go like clockwork. (BTW, even though it is barely necessary, it is still definitely a good idea to quickly read the manual before you start, as there is actually an ideal order of what to connect first, and even some other details you'd rather be aware of ahead of time. Case in point, albeit not mentioned in the manual, but by me in this review, when you are screwing onto plastic threads, do not force anything. If it is stubborn you are cross-threading and ruining your Bidet before you even get it installed. The trick is to carefully get your threads started and then gently pull on the tubing directly away and in perfect alignment with the fitting while you are continuing to screw the connection all the way with only your fingers, no tools needed. Let the nut pull the fitting together rather than pushing the tubing towards the nut. This removes any kind of bind that might give resistance and make you think you need to put a wrench on it. Frankly, all the fittings have rubber washers, so if you get every connection as tight as you can with your fingers, you may not even need to snug some of them any further, and if you do find one or two dripping after turning the water back on, you will only then need the wrench to give them a quarter turn, or so. Overtightening will only serve to pinch your rubber washer and cause it to leak more, instead of less.One more point to make, before moving on. There are a lot of comments about not needing a hot water option, which frankly, is likely to be true, especially for those living further south, although I have not had a chance to see what the water feels like at its coldest temps in the winter, so that remains to be seen (or better said, felt.) From what I can tell at this point, though, I suspect my fanny will not be overly shocked by a blast of cold water, not being nearly as extreme as stepping into a cold shower. That said, I opted for the hot and cold water version of the Bidet, full-well knowing that I would have to give the hot water a significant amount of time to travel the pipes before turning it on my rear end. The simple way to do that right at the Bidet, is to turn both the front lever and back dial clockwise all the way to the right (about the 5 o'clock positions) to the hot and self-cleaning modes, respectively, and let them run full blast while you are doing your business. (I actually timed mine and it takes about 2 minutes for the water to get hot.) A quicker way, is of course, to turn on a larger sink or bathtub faucet but frankly, I prefer using the self-cleaning mode of the Bidet for the multi-benefit of letting it do some self-cleaning while the water is warming up. That's probably how it's going to happen in the dead of next winter and those thereafter. (Update: Having used the bidet for several months and now getting into cooler water temps, I'm am even more convinced that the hot water option is not all that necessary, but if you are in doubt, this hot and cold model can still be initially or even permanently installed as a cold water only bidet by making use of the cap provided in the kit to seal off the hot water side. This might be a desirable approach, as the cold water side will be the easiest to quickly install vs. the potentially more challenging logistics of hooking-up the hot water side, which you could always do later. Of course, you could also go with the cold water only model in the first place and save a few bucks, but if you want to play it safe and have the hot water potential available, this unit will provide all the options.)While we're considering the versatility of the settings for various functionality, there are some comments about the spray being too high pressure, also, which must mean that they are surely not reviewing the Luxe Bidet NEO 320 Plus, as there are actually a variety of ways to adjust the water pressure, albeit the most obvious one is to use the actual built-in feature for that purpose and simply turn the lever counterclockwise to the left. Turning it to the right also works, for that matter, though that direction is meant to bring in more and more of the hot water, which in turn reduces the cold water supply. Since the hot water line is smaller than the cold water line, routing through that smaller line also has the effect of reducing volume and pressure. Another way to get less pressure is to simply not pull the lever up all the way. Yet another option is to turn the back dial slightly to the left or right to reduce pressure by sharing with either the feminine or the self-cleaning functions. If already in the feminine position, simply turn to the right and share with the center, standard position. Finally, there is always the last resort option that the manufacturer suggests, of adding a dedicated valve to the line(s) and cutting back your flow there, although, I doubt that's necessary for most folks. I have great water pressure and I am able to easily reduce it as I've described, although I don't really find it necessary or even desirable. I like the solid power-washing effect, albeit perhaps necessary to be careful about where you let it directly hit.Okay, now, let's talk about the actual installation. In my case, I use those soft vinyl covered foam seats that crack and wear out every few years, primarily because that's the only version I can find in the color I want. (Yes, I could easily paint a different seat the right color, but I get about five years out of the soft version, and they really don't cost that much to replace. I even keep a new replacement seat on reserve and ready for that inevitable day when the outer vinyl covering on the old one finally cracks and becomes unsightly.) When I first slid the Bidet, as it comes in the box, under the hinges, it looked like they were going to make contact with each other before the seat was all the way in the down position, so I proceeded to put the thicker horse shoe shaped brackets on to see how that worked. (I provided some pics to show you how easy that is.) Well, once I did that, it was clear that I was going to want to order some thicker stick-on pads to fill the extra space between the seat and the toilet rim, but as I studied it, I decided that the thinner brackets might actually have worked, once it was all tightened up. Sure enough, they did! Barely. There was an initial rub between the brackets and the seat hinges, but it was so minor that it fixed itself by wearing a minute corner off of the softer seat hinge. I could have even filed it, if necessary. Anyway it was a much better solution, as I no longer needed to add any thicker pads. With this type of seat it is highly flexible, so even if the back pads are not initially touching, they will once you sit on it, and that works perfectly! There is a tiny downward slope towards the front of the toilet, but it's really minor and essentially not even noticeable. In fact, the seat has taken that new shape, so it looks like it is meant to be. (I've provided the pics so you can decide if you agree, or not.)Another quick detail in this phase of the install, is that I opted to push the Bidet all the way back, which in my case, meant that it cannot be tilted up to the full 90 degrees, for cleaning. It can, however, still be lifted to about 45 degrees which is plenty to get under it for cleaning, so that works just as well, and I get the benefit of getting the sprayers and cover further out of the way. It does mean that the aim of the spray is proportionately further back too, though. So, for some that may be a factor to consider. I personally don't find it problematic in the all the way back position. It's usually necessary to move around a bit anyway, for a thorough washing everywhere you want it. Now, for the far more significant caveat. Once again, in my particular case, with a 50's built home (that's 1950's for you younger folks) this was far from a 10 minute install. Between corroded and stuck valves to even having a larger size male connection at the bottom of the tank filler valve, I was destined to be shutting the main water supply off and replacing some additional parts not supplied in the kit, not to mention needing a larger array of tools. I gave you a few pics to see what my actual installation project entailed (through no fault of the excellent Luxe Bidet manufacturer, I should add). I had already been planning on replacing the old original brass filler/float valve anyway, so it was the perfect time to do it. I also had to replace a hot water supply valve under the sink, due to the existing valve's stem shearing off (fortunately in the off position). Since it was on the hot water side, I actually just shut off the supply to the hot water tank, rather than to the whole house, to replace it, although I had to crawl into the attic to get to the valve, so with hindsight, I'd have been better off just shutting the entire water supply off at the main water meter, next to the alley.In the final detail, for the cosmetics of the visible portion of the white, hot water supply tubing to the Bidet, I opted to line it up with a white grout line at the same height, using peel and stick clamps to hold it in place. Alternatively, I could have run it at the very base of the wall, but it was such a short portion that was visible that it didn't turn out to be an eye-sore at its natural height. Oh, there was one other incident that I should mention. At one point I wound-up disconnecting the cold water supply from the plastic threaded Bidet control head and out came a little cylinder consisting of o-rings and plastic washers sandwiched together, which turned out to be a back-flow preventer, that frankly, is pretty non-essential, even silly, but California (where the manufacturer is) has its rules... Anyway, the ends of the cylinder were different, so it definitely had a direction that it was supposed to go back in. If that happens to you, simply put it back in the hole of the control module with the protruding plastic blade (looks like a minus sign) first and you'll be good to go. If you put it in backwards, you won't get any water, but it will be easy to grab that same blade with some tweezers and pull it out and reverse it. Of course that is one more time you will have to carefully screw onto those plastic threads without cross-threading them, so it's best to put it in right the first time. If you never have to take it apart in the first place, you won't have it happen, either, so read the manual, follow their suggested order and think through how you are going to want your tubing to look in the end, etc. For most, this will all be like clockwork, and you'll all be patting yourself on the back for going with a Bidet, especially this Luxe Bidet NEO 320 Plus!
D**O
Overall good product but I have a suggestion to DIY installers.
Installation was pretty easy. While every toilet install would be different based on the many factors, I would recommend that once your disconnect your in-feed water line to the toilet tank to replace the water line completely. The washers within the line have been compressed for a long time and once undone, the washers will not maintain a good seal and leaks will happen. By replacing the flexible water line from the house to the tank, leaks will be avoided and the installation process will be smoother. The flex line is usually less than $8 at the local box store so it's worth the effort.The bidet itself is very intuitive to use and does as advertised. The self cleaning mode and flip up feature are positives for sure.
K**M
Nothing cleans better than a bidit
Two years ago I broke my Ulna bone on my right arm. In fact, I broke this same bone twice in six weeks. After they took out my staples for the first surgery, they put a soft cast on my arm. Five weeks later, I came back for an x-ray. After the doctor examined the x-ray, he was not pleased at what he saw on my latest X-ray. I managed to break the same Ulna bone, in the same spot. Being that I’m a dominant right handed person, using your left hand to take care of your hygiene in the bathroom isn’t as easy as one would think.I’ve been reading about these bidets they have offered on Amazon. The comments made about these items convinced me this bathroom devise would be a big help. So I purchased one.IAfter breaking my arm two years ago, and using a bidet for the first I would not trade my bidet for another roll of toilet paper. Once you learn how to properly use it, you’ll find yourself refreshed and clean every time you go to the bathroom.Men, it’s not easy to work when you got skid marks, from not having yourself wiped clean. You will be constantly trying to find a secluded spot where you can find relief from the itch, from an unclean wipe. The bedit directs an intense flow of water rinsing with hot, cold or a mixture of both, cleaning those embarrassing skid marks from your tightly-whiteys.
P**S
Oveall good product, but hot water line has issues
I give this bidet a solid 4, but could have been higher if not for the warm water installation issues. First the good. Once installed the Bidet does a great job. Warm water option helps clean better and faster. Easy to adjust once on the toilet. I also like the multiple functions for high and low water pressure based on personal preference.The installation over all was fine up until I hooked up the warm line. The warm water T unit is designed poorly. There is virtually no seal that will work in the unit to keep it from leaking that will not cutoff water pressure. The black rubber seal that comes with the unit folds in half if you try to tighten at all, causing it to go up and inside the plumbing pipe.I tried using several sized beveled rubber washers. This did seal the leaks, but also cut off water pressure causing loud noises from the pipes when I turned on the hot water in the sink. I had Luxe send me a new T valve unit, but they sent me the same rubber seal with the new unit and the T unit still leaked. I finally resolved the issue by supergluing the rubber seal to the bottom of the T valve. I used a special liquid plumbers tape and traditional plumbers tape when I re-installed the T unit. This stopped the leaking from the T valve unit and I had correct water pressure from the sink and bidet with no pipe noise.I also had issues hooking up the hot water line to the bidet control unit. It did not want to go on strait , causing the line not to seal to the unit and leak. I had to remove the control unit from the toilet, use my thread tap tool set to re-do the threads. Then I was able to screw the warm water line on the bidet control unit and seal without any leaks.Another option would be to not hook up the warm water line, but then you may as well get a unit with just the cold water option and pay less.
Trustpilot
1 month ago
1 month ago