


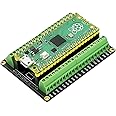
Breakout Board for Raspberry PI PICO Flexible PCB Shield Board Terminal Block Shield with Pin Header
Details
- BrandTreedix
- Model NameRaspberry Pi
- Connectivity Technologysome wired
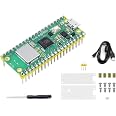
- Included Components1*PCB board
- CPU ManufacturerRaspberry Pi

Description
⚡ Ignite Your Projects with the Ultimate Breakout Board!
- COMPACT DESIGN - Perfectly sized at 3.43 x 2.95 x 0.47 inches for any project.
- DIY ASSEMBLY FUN - Solder it yourself for a hands-on learning experience.
- SEAMLESS INTEGRATION - Easily connect and develop with additional pin headers.
- GOLD PLATED EXCELLENCE - Experience superior conductivity and durability with gold-plated connections.
- UNLEASH YOUR CREATIVITY - Transform your Raspberry Pi Pico into a powerhouse of innovation!
The Breakout Board for Raspberry Pi Pico is a flexible PCB shield designed for DIY enthusiasts. It features gold-plated connections for enhanced performance and requires self-soldering for assembly. This compact board allows for seamless integration with the Raspberry Pi Pico, making it an essential tool for innovative projects.
Specifications
| RAM | LPDDR4 |
| Wireless Type | Bluetooth |
| Brand | Treedix |
| Series | Raspberry Pi Pico |
| Item model number | TRX5-0139 |
| Item Weight | 0.634 ounces |
| Package Dimensions | 3.43 x 2.95 x 0.47 inches |
| Processor Brand | Raspberry Pi |
| Number of Processors | 1 |
| Manufacturer | Treedix |
| ASIN | B091F7YSCD |
| Date First Available | March 31, 2021 |
Have a Question? See What Others Asked
Reviews
A**Y
You will need a fine tip soldering iron and the thinnest solder you can find
Since I was planning on doing some Pico projects I thought the terminal block would be a good idea. I was pleasantly surprised with the quality of the parts even though they looked very small compared to what I was used to back in my working days. Luckily I have a fine tip soldering iron and a bunch of really good very fine solderwire. I hadn't soldered up headers in quite a while so I was pleased with myself as well. It makes a very nice tidy piece of kit.You will need a 2mm straight blade screwdriver for the terminal block screws as well. Since I mostly work with Raspberry Pis, I will have to get some M2 hardware for standoffs but that's not a problem as long as I use it on a non-conducting surface.
G**N
Great
Prompt delivery, product exactly as described. Will use this vender again.
S**Y
Very good, but one flaw and a warning
Edit: After actually assembling the product I discovered something that could have been a huge problem. No matter how hard I turned the screws in the terminal, the jaws would not close. There was plenty of room to insert a wire, but no motion upon turning the screw. It turns out that these terminals arrive in a fully closed position, unlike the dozens or hundreds I have used before. You have to turn counterclockwise until the original opening starts to close and new one appears. Then you can proceed as normal, inserting a wire in the new opening and tightening the jaws.== original text ==I have not assembled this yet, but there are already some observations, partly in response to other reviews.1) In general this is well made. It is nice that the headers are made to exact length so there is no cutting to do.2) Yes, you have to solder the headers, but it's easy.3) No, you do NOT have to bridge solder between the green screw terminals and black headers. These are the lines in red on the schematic. It is already done internally, as noted by another user. My ohmmeter agrees.4) The screw terminals are tiny. I'll have to switch to a smaller screwdriver blade when switching between these and the ones on my other gadgets. A pain, but not a deal breaker (but see the edit above).5) I don't know yet whether the terminals are fragile, but thanks for the warning. I'll try to unscrew them no farther than necessary.6) The line of holes between the Pico header and the screw terminals is blocked by the terminals. This is definitely a design flaw, because you can't through-solder in the normal way. I suppose that things like resistors or simple wires will be okay, inserted from the bottom just 1 mm into the hole.Back to the screw terminals. The most common screw terminals seem to be on 3.5 mm centers, while the Pico pins are on 2.54 mm centers. This forces everything to be smaller. It probably would have made the board larger or more expensive to use beefier screw terminals. For example, fanning the terminal holes out to 3.5 mm spacing would have added 18 mm to the board length.In general I'm happy to have this. It will make it easy to work with the Pico until I have figured out what I need for my project. For the final design I'll probably end up with a custom circuit board.
E**L
Very helpful for driving WS2812 LED strips from PI PICO W
I had an existing WS2812 based LED light system that I decided to rebuild using the Raspberry PI Pico W microcontroller. So, I got one, and also got the Treedix breakout board to go along with it.It all went together easily. As part of my setup for the PI Pico W, I realized I would also need to step-up the output voltage from 3.3v to 5v to adequately drive the LED strip. This would have been a pain ordinarily, but this breakout board made it a snap.I used a SN75AHCT125N chip (also on Amazon) to convert the GPIO output to the needed 5v - this breakout board has a perfectly sized breadboard under the PI Pico W where I was able to add the chip and wire it in. Now it drives the WS2812 strip like a champ and it all fits perfectly.This is a very helpful board and makes making small changes like that really trivial to do.
D**S
Great tool for that DIY Pi Pico project
I decided to build a custom pool pump controller out of a Pi Pico W. The only other hardware involved was this Breakout Board, a Teyleten Robot DC 1 Channel Optocoupler 3V/3.3V Relay (also from Amazon), a 28VAC doorbell transformer, some wire, and some plastic board to mount everything on. The board was an indispensable component in the project. If I do any similar projects in the future, this will almost certainly be on the shopping list.
M**E
FYI
The smallest little flat head screws ever.
W**H
Third time purchase.
The kit comes unassembled. The ad said 'welded' which I assume got lost in translation from Chinese to English. So you will need to solder the components together. My concern is the terminal blocks are VERY small and require a tiny flat head screwdriver. I tried to back out a terminal screw to connect a 16 AWG wire and the screw internally seperated from the terminal. So now Pin 5 won't tighten or loosen making the pin useless. Beware of this when connecting wires.
F**C
More secure connections
Bought more of these. The connection to regular wire and to Dupont breadboard wires is more secure. Useful too with half size breadboards.
Common Questions
Trustpilot
2 months ago
4 days ago
