🕰️ Time to Craft Your Style!
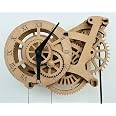
The ABONGLaser-Cut Mechanical Wooden Pendulum Clock is a meticulously designed DIY model kit that combines craftsmanship with learning. Made from high-quality wood, this clock features a quartz movement and offers an engaging assembly experience, allowing you to personalize your creation while adding a modern aesthetic to any indoor space.


| Item Dimensions W x H | 7.87"W x 9.84"H |
| Mounting Type | Tabletop |
| Watch Movement | Quartz |
| Operation Mode | Mechanical |
| Alarm Clock | Yes |
| Power Source | Battery Powered |
| Indoor Outdoor Usage | Indoor |
| Batteries are Included | No |
| Display Type | Analog |
| Special Features | Pendulum |
| Theme | Plain |
| Shape | House |
| Clock Form | Pendulum |
| Style | Modern |
| Color | Mechanical |
| Frame Material | Wood |
| Material | Wood |
I**H
This kit is exactly what it is supposed to be.
The media could not be loaded. If your goal is to have an an easy to assemble highly accurate clock kit than this is not what you want. If your goal is to learn about how mechanical clocks work and how to troubleshoot one, this is exactly what you want.This kit requires some patience and some problem solving but is rewarding in the end. Reading and following the directions will leave you with a visually attractive, functional clock. The directions are well written and directly address most, if not all, of the issues that other reviewers have had. Mine initially ran about 20 minutes slow per day, but with some tuning (this did require cutting the pendulum to adjust its length) I've gotten it to under a minute of error per day.I had fun building this kit and I am glad I purchased it.
K**Z
Reward yourself with this mechanical clock kit.
Top quality product with clear and easy to understand instructions. It takes a while and a lot of concentration to assemble the kit. Definitely not for somebody without mechanical skills but in the end, a most rewarding build. After two months of usage, the clock stopped working. It turned out to be due to high humidity in the air. Had to sand down a part here and there to get more clearance and it worked perfectly after that. One thing, the tick tock of the escape wheel is the most relaxing sound you can get.
D**G
Requires a moderate amount of skill and lots of patience to build successfully.
The media could not be loaded. SKILL LEVEL:3/5, IntermediateSUMMARY:This is not a clock kit for the beginning builder. Building a simpler clock like the Abong Crossingham would be a better introduction to building wood gear clocks. This clock requires a modest amount of tools including a small razor saw, a hobby knife, glue and several sheets of sandpaper. Additionally, you must have a fair amount of patience and the ability to pay attention to small details.PROS:1. Simple to assemble.2. Very nice printed instruction manual.3. Large gear teeth that are easy to sand.4. Error tolerant design.5. Keeps accurate time once adjusted!CONS:1. Wooden axles that, by the nature of the material, are not very accurately sized.2. Requires lots and lots of sanding of the gears and cogs to allow them to fit with as little friction as possible.3. Hardening of the gears and axles needed to reduce friction.4. Need to acquire tools if you don't have them already.5. Need to acquire material for the drive weight.6. The rewinding mechanism is awkward.BUILD TIPS:1. I used a good hobby quality cyanoacrylate (superglue) adhesive in thin and medium viscosity with a fine applicator tip throughout the build to avoid waiting for a wood glue to set. If you haven't used CA glue before, practice on some scrap bits to judge how long it takes to set.2. I hardened all the gear teeth with a drop of thin CA and then sanded each tooth until almost all the brown resin from the laser cutting process was removed. I did this before I started assembling the gear sets. This takes a fair amount of time. Hardening the teeth reduces friction and will reduce wear on the teeth.3. I hardened each axle hole in each gear with CA and then sanded it smooth with a bit of rolled up sandpaper. I used very fine 400 grit paper.4. I hardened each axle with CA, sanded it smooth, and then waxed the contact areas with candle wax. I did not use graphite anywhere for lubrication .5. I used the wooden washers to locate the gears on the axles but did not glue them in place until AFTER the clock had been fully assembled. This allowed the gears to be slid on the axle shafts to allow proper clearance between gears. Only after I was satisfied with the gear spacing did I glue the washers in place on the axles to fix the gear positions. Make sure all gears spin as freely as possible and don't wobble. Also check to ensure there us no interference between contacting gear teeth. A little clearance is ok.6. I triple checked to make sure all axles were perpendicular to the baseplate, parallel to each other and firmly glued in place.7. I used pins to hold the top brace in place instead of gluing it to the axles. This allowed me to disassemble the clock to make adjustments. I made the pins from a paper clip. (See photos.)8. Take care to reduce friction wherever possible. I was able to get my clock running as soon as I hung the drive weight filled with 4 pounds of lead. With some fine tuning, my clock will tick reliably with just 1.75 pounds of weight and run for six hours for every 10 inches of drop.9. I used a carbon fiber rod for the pendulum because I didn't like the multi-piece rod in the kit and happened to have one on hand that I stole from a kite..10. Overall, it took me about 40 hours to build this clock - 20 hours were on sanding alone, 10 hours on assembly and 10 hours tuning, remaking some parts and finishing with three types of wood stain.RATING: Four Stars.Overall it was a fun and satisfying build. I took off one star because if they had laser cut the gears slightly smaller, or spaced the axles out slightly farther apart, then you wouldn't have to do as much sanding of the gears to reduce the interference fit between gears. Also, the method of re-winding the clock could be improved.
O**E
Please Read Me, You Must Make Some Parts
The media could not be loaded. First and foremost, this kit takes time patience to complete. All in all, it took about 60 hours to complete it to the running state that you see in the photos and video. Yes, the kit will run and it will keep time if you take the time to assemble it well. If you are planning on just a few hours to assemble this clock you may want to avoid this kit and the frustration. The outside of the box says the difficulty is at an "Expert Level", but if they fixed some of the problems this kit its really more of an intermediate level of difficulty, please read on.Issues abound in Abong Clock, first and foremost, all the dowels are much smaller that the laser cut holes they go into. The larger and longer dowels are also to small for the holes laser cut in the base board for the clock. The larger dowels for the gear shafts are shorter than needed so you will need to make adjustments to the clock to accommodate for this issue. To help remedy this, I made screw on brass caps to hold the outer framework on to the clock (the two arches). The brass caps also made it possible to easily remove the outer framework and remove the gears in the future. This also helped hide the fact that the gear shafts are to shorter than required.I used as little glue as possible and zero wood glue as this tends warp the wood with its water content. I used only 15 minute Epoxy and Super Thin Cyanoacrylate (super glue), to assemble the clock. I also had to make a new hub for the escapement gear as it would not run true with the wood hub parts provided (oversized holes in the parts, equals, lots of wobble). Other shafts needed to have adaptors and bushings made so they would run true on the shafts and reduce the slop between the gears.Overall the laser cutting is of good quality on the larger items in this kit but as stated before, the small holes were way oversized for the shafts (dowels) provided. I used a drop of the very thin super glue to harden the ends of all the gear teeth. Applying a drop in each tooth and letting is soak in and harden overnight worked very well. The gears are cut out of thin plywood and are very, very brittle and chip easily. This is a huge problem with the escapement gear as the teeth are very fine and need to keep there specific shapes. Once the escapement gear teeth are well hardened they can be smoothed up so they engage and disengage smoothly. If this is not done the pendulum will pick up a vibration and loose the most of the power from the dropping weight. I also needed extra mass on the pendulum and made a 3" brass pendulum weight with a 8-32 thread, to replace the way to light screw, the screw does not provide the needed weight to keep the clock going and on time.Once done the clock MUST be hung so that the Hour and Minute hands are dead plum and level. If they are not, the clock will slowly lose momentum and stop running. This is due to the angle of the escapement lever engaging the escapement gear. So with enough time and effort this is a nice clock, that runs well, keeps okay time and makes a wonderful "Tic Toc" sound.I wish the makers of this kit would open up one of there clock kits and look at the obvious problems that they are shipping out the door, maybe, just maybe they would fix the kit. If the manufacturer would fix these problems, this would be a fantastic little kit clock that would work well when you follow the provided instructions. And by the way, the provided instructions are okay, better than most. But there is ZERO about trouble shooting this clock if you have any issues. This is where the problem with the clock being out of plum and level at the Hour and Minute hands is so very important.Thanks for reading my little review, I hope this helps anyone that buy this kit.
Trustpilot
3 weeks ago
2 weeks ago