✨ Elevate Your Kitchen Aesthetic with Giani! ✨
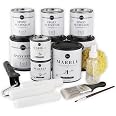
The Giani GraniteGiani Marble Easy Epoxy Countertop Paint Kit in Carrara White is a comprehensive solution for transforming your countertops. This all-in-one kit includes everything needed for a professional-grade finish, covering 35 square feet with a durable, water-resistant epoxy resin topcoat. Ideal for various surfaces, it features a low-odor, zero VOC formula, making it safe for indoor use.


| Brand | Giani |
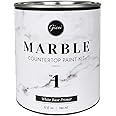
| Color | Carrara White |
| Finish Type | Gloss |
| Size | 1 Count (Pack of 1) |
| Item Volume | 800 Milliliters |
| Special Feature | Water Resistant |
| Unit Count | 1.0 Count |
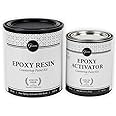
| Paint Type | Epoxy (Topcoat) & Acrylic (Primer & Minerals) |
| Specific Uses For Product | Interior |
| Surface Recommendation | Indoor |
| Indoor/Outdoor Usage | Indoor |
| Item Form | Liquid |
| Included Components | 31 oz. Marble White Primer, 6 oz. Grey Veining Mineral, 3 oz. White Highlight Mineral, (3x) 9 oz. Epoxy Activator, (3x) 18 oz. Epoxy Resin, 6" Giani Roller Arm & 3 Roller Pads, 2" Brush, 4" Giani Paint Sponge, 2" Foam Brush, Artist Brush, Misting Bottle, Practice Board, (3x) Wooden Stir Sticks, #600 Grit Sandpaper, Epoxy Gloves, 9'x12' Plastic Dropcloth, Step-By-Step Instructions |
| Age Range (Description) | Adult |
| Is Waterproof | False |
| Model Name | Epoxy |
| Package Information | Can |
| Color Code | #f3f6f4 |
| Coverage | 35 square feet |
| UPC | 856512007941 |
| Global Trade Identification Number | 00856512007941 |
| Manufacturer | Giani, Inc. |
| Part Number | Marble |
| Item Weight | 5.94 pounds |
| Product Dimensions | 13.75 x 12.75 x 12.25 inches |
| Country of Origin | USA |
| Item model number | Marble |
| Style | Epoxy |
| Finish | Gloss |
| Pattern | Paint Kit |
| Item Package Quantity | 1 |
| Special Features | Water Resistant |
| Batteries Required? | No |
| Warranty Description | Contact manufacturer regarding details of limited warranty |
J**N
Expect happy accidents and imperfections
The media could not be loaded. LONGGGGG review, so if you’re curious what a crafty DIYer did, keep reading.Okay, so my husband and I bought our home just over a week ago. Before moving in, we renovated majority of our house. We painted every single wall in our living room, dining room, hallway and kitchen save where the backsplash I will install after the counters are 3/4 of the way cured (hence that hideous muddy pink color under the cabinets I haven’t painted over that was wreaking havoc EVERYWHERE). I still shudder at the previous owners design choices… I even sanded our cabinets and repainted them this gorgeous blue color. In love. Anyway, we want to eventually replace the counters with butcher block, but it is not a pressing matter at the moment. We much rather spend the money on other renovations. Okay, so that’s the backstory.I was a nervous wreck when I finally got around to redoing our counters five days later than I originally planned. No fault in Amazon’s delivery. Everything was packaged perfectly. I’m a new mom: my baby is adjusting to temporarily living with my in-laws and my husband and I have been out of the in-laws house renovating our new house. I read nearly every single review before deciding on going with this kit. I wanted a completely white kitchen. That was not happening. I have two dogs, a cat, a 3 month old child and a husband who makes a mess when it’s his turn to cook. White was NOT going to happen, but damn it, I was going to have SOMETHING white in my kitchen even if it was only my backsplash and counter tops. Go on, keep reading.Here’s a few things I did a little differently when painting the veins: I used a ton of water to get a very muted vein pattern. I wasn’t really happy with my millionth attempt and just could not figure out what I was doing wrong until in my frustration, I accidentally dipping my softening brush in my wash cup and painted over a vein with watered down white base primer. It was PERFECTION. I promptly painted over all of my top dark softened veins with watered down white paint and the veins turned out exactly how I imagined them. I let them dry overnight. When I painted the base primer, I left it overnight. I didn’t want to take any chances on the paint not being dry for the epoxy. I suggest the same if you have the time.While pouring the epoxy, yes there will be bubbles that eventually harden and you can do nothing about unless you feel like sanding it down and starting over. Not an overwhelming amount and not enough to be a problem, but there will be bubbles and you just have to be okay with that. I used a cheap rubber spatula to get allllllll of the activator out of the can and asked Siri to start a 3 minute and 3 second timer to mix. Don’t stir HARD because you’re just going to create more bubbles, just a little aggressively. Like you’re-mixing-brownies-and-your-partner-asks-for-the-millionth-time-what-color-is-this-wall-going-to-be-despite-the-wall-being-swatched-in-the-exact-color-it’s-going-to-be-painted-but-you-can’t-be-upset-because-they-are-the-love-of-your-life-and-you’re-just-a-little-annoyed kind of aggressively.I had NO animals in the house and somehow, someway, there is ONE SINGLE CAT HAIR that I did not notice until the next day when I couldn’t do anything about it. Whatever, it adds character.Really listen to the instructions when they say remove the painters tape after an hour or two. I was in the middle of painting my doors black when it occurred to me I completely forgot to remove the painters tape and tarp around my kitchen sink. There was slight dimpling around the counter where it meets the sink. I’m planning to just cover that up with some caulk. No one will ever know except me. Perfectionist me. I will always know it’s there and it will forever bother me. But honestly, I’m okay with that. Also, DON’T USE A TORCH TO TRY TO GET BUBBLES OUT. I had to scrape a bit of the burned resin off the counter and re-pour that area my husband thought he was helping me and nearly set the damn house on fire. Unless you know what you’re doing (MY HUSBAND DID NOT), DO. NOT. USE. A. BLOW TORCH.If you have a corner like we do, do the farthest distance first. I had epoxy all over my shirt that I had to promptly sacrifice to the rag bin because there was no saving it once the epoxy hardened.When you tarp, double tarp if not triple tarp. Somehow epoxy ate through a few spots and I had a whole two piles of resin on my floor. Once it hardened, I just used a razor scraper and most of it came up. The bits that didn’t are just going to be covered with chef mats. The floor will be replaced eventually.Every time you pour and you get drips, wipe the drips with your gloved finger to prevent the drips from hardening. I have one single drip that I didn’t spot, but it’s not a huge deal. I was about to cut it off with a razor blade.The counters are SO SHINY. I hope they stay that way. So far, they look fabulous.I can see some texture on the backsplash but of the counters, but again, not a huge deal. It’s not like I’m going to be touching it often and it’s mostly out of reach.TLDR:1. Double, triple tarp. Epoxy ate through my tarp.2. Don’t use a blowtorch unless you want your counters to catch fire.3. There will be bubbles. It happens.4. If you have pets, even if they are not present, you will get a hair.5. SO SHINY.Overall, I’m happy with it. It’s a great temporary cure for something that will be replaced in a few years. Epoxy will yellow over time, so if you’re doing white like I did, expect it to happen eventually. I will update once I wait the full seven day curing period to let you know if there are any spots that showed up or if any divots occur with the coffee machine and baby bottle sanitizer doohickey and bottle warmer.
J**H
So easy and gorgeous results!
The media could not be loaded. Here is my review on the Gianni, white marble kit! It came out so beautiful. I can’t believe I did it! I read reviews and watched videos for probably a month while I decided if I wanted to take the plunge! I have granite and just can’t spend the money right now to get the white marble that I really wanted! I figured what do I have to lose since I hate the counters and if I ruin them I will just have to get new ones ha ha!The kit has everything you need except the frog tape, paper plates and paper bowls, which I used for the veining process and also for the highlighting at the end which really made the whole counter pop! I did not like the tiny brush they sent so on some of the videos I watched on YouTube they used a turkey feather. I highly recommend this as the lines came out beautifully and very natural! I dabbed the feather, then dabbed on a paper plate and dragged the feather up down back-and-forth to get some really nice lines! I needed a paint tray and used foil to line it for each coat so i could throw it out easily and use the tray for the next coat. I put my roller in a baggie in the fridge so it wouldnt dry out between coats. I did buy a few extra sponge brushes which I used, but the one in the kit is far superior. Whoever thought there was actually a real quality sponge brush!I studied the veining on YouTube videos, Google, Pinterest you name it since this was the most important thing to me…the right look, shading and design. I finally found a few I really liked and took pictures and put them in my phone in an album. I decided which ones I wanted to use on each section of my counters. I practiced drawing them on paper over and over, and then when I did them on the actual counters, I kept my phone right there to use them as a guide, which really helped! The kit includes a very small practice board and I did a few veins on it and saw how easy this would be. I really can’t believe how beautiful they turned out! I did 3 main veins on either side of my sink and played around with them then added some extended and some very light veins. Less is more and be careful not to go too dark.I set up a covered table the night before with everything that I would need. The whole process took about 14 hours but I have a very small kitchen with about 18 sq. ft. of counters. I got a good nights sleep and got up about 5 o’clock in the morning and started with my taping and then my first coat of primer which took about an hour total. I made a cup of coffee and waited an hour and did a second coat and then a third after another hour. My granite is dark, so it really needed a third coat. Then I proceeded to the veining. I have to admit I was very stressed hoping I could do this and do it right. It turned out to be so much fun very easy and I just love them! I used the pics on my phone as my guide which really was helpful. Then I waited four hours before I did the epoxy. I went out and had lunch and took a drive came back and again was very stressed because this part really scared me. It turned out it was so easy although it probably is the most detailed part of the entire project. I feel like I needed to use more of the epoxy than they said, unless I just didn’t figure it right. Make sure you tape and cover everything including the floors in front of everything. I actually didn’t get anything on my appliances or floor, which I was shocked! I checked my epoxy every 5 minutes for the first 30 minutes or so and found lots of small areas I missed or little “sink” holes that would pop up. Check under the edge constantly for drips. I used a sponge brush to even them out. If they dry you will have hard drips under the edge and I’m not sure how you get that off. Definitely use frog tape. I will never use blue tape again. The frog tape is unbelievably superior! I had a little tricky area on the counter sides on either side of the stove. I decided to not use the epoxy there and just use a water soluble polyurethane. I just felt it was going to be easier without having all the dripping going down the sides in that area and then I could put my stove back while I did the epoxy in the kitchen and I had more room to move around. I think that was a good move. I left the tape on for over an hour until there were no more drips under the edge. I have no pets and I closed my AC vent so I had no specs of dust, bubbles or hairs. It’s so beautiful like a sheet of glass! Note* wear rubber gloves when handling the epoxy incuding pulling off the tape. It’s VERY sticky and hard to get off your hands!All in all, the process was super easy and fun, but I did take my time to prepare with tape and the drop cloths. I have an Undermount sink so I felt that was a little tricky to tape around it, but I took my time and everything came out beautifully. Take your time enjoy it and you will be so happy with your counters when you’re done! It’s really an easy and fun project!! I feel like I have a model home now! Absolutely love my kitchen counters, and this product!
C**R
Very happy
This kit came with all we needed aside from the tape. We went with 3 coats of primer instead of 2 coats because our original counters were so dark.Definitely use the practice board before applying to the countertop. And using a reference/mapping out the direction of the veins was an excellent tip. The veining application was a lot of fun and even seeing our larger veins, I’d say less is more. You can always add more. The blotting with the paper towel helped give dimension to the veins. We stuck to the time span for each step to allow for proper drying and curing. Overall, it turned out beautifully! We couldn’t be happier. Follow the directions exactly and all should go well.
Trustpilot
3 weeks ago
2 days ago